Share this article! Here's a short link you can use: http://im.vu/help1050
Experience IMVU in higher resolution by adjusting the High Density Pixel Interface (HiDPI) and Anti-aliasing settings! These options are available only on IMVU Desktop/IMVU Website and IMVU Studio.
What is High Density Pixel Interface (HiDPI)?
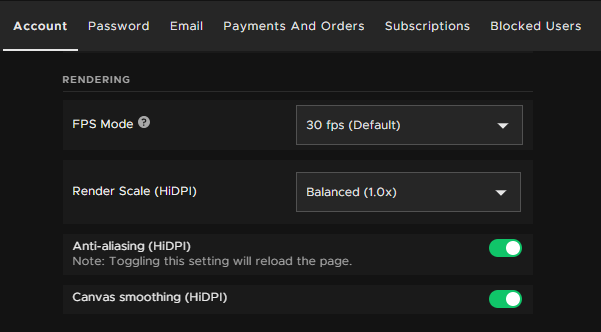
High Density Pixel Interface (HiDPI) allows you to change the render scale when using IMVU, allowing you to experience IMVU in higher resolution and take higher resolution pictures and videos. There are four options you may select.
- Better Performance (0.5x)
- Balanced (1.0x)
- Better Quality (1.5x)
- Best Quality (2.0x)
What is anti-aliasing?
When you experience IMVU on a lower resolution, items may have a pixelated or jagged look, especially around curves or edges. Turning on anti-aliasing helps smooth those edges creating a better quality look.
What is canvas smoothing?
We recommend keeping this setting on unless you have a very slow computer. This setting improves the image quality on lower resolution texture maps within clothing, furniture or room products.
What HiDPI and Anti-aliasing setting should I choose?
You may want to choose settings that provide you the resolution you desire while also balancing the performance impact on your computer.
Setting the HiDPI render scale to Better Performance (0.5x) will give you lower resolution quality but better performance, whereas Best Quality (2.0x) will give you higher resolution quality but slower performance on older computers.
Turning on Anti-aliasing will improve the visual appearance of IMVU, especially for those who may choose a lower HiDPI setting.
The settings you choose will apply to your entire experience on IMVU Studio or IMVU Desktop/IMVU Website (e.g. Chat, Shop, Inventory, etc).
Adjusting Settings On IMVU Website/IMVU Desktop
STEP 1. Launch IMVU Desktop or IMVU Website. Click your profile icon in the top-right corner of the page, and go to Settings.
STEP 2. Under the Account tab, scroll down to the Rendering section and select your preferred render scale from the drop-down list. Toggle Anti-aliasing and Canvas smoothing to turn them on or off. Toggling Anti-aliasing will reload the page.
Adjusting Settings on IMVU Studio
STEP 1. Launch IMVU Studio and go to Preferences.

STEP 2. Go to Render Scale (HiDPI) and select your preferred render scale from the drop-down list. Toggle Anti-aliasing and Canvas smoothing to turn them on or off.

Keyboard Shortcuts for Adjusting Settings for IMVU Desktop/IMVU Website and IMVU Studio
Keyboard Shortcuts For Mac
- Better Performance (0.5x) - [Ctrl-Opt-1]
- Balanced (1.0x) - [Ctrl-Opt-2]
- Better Quality (1.5x) - [Ctrl-Opt-3]
- Best Quality (2.0x) - [Ctrl-Opt-4]
- Anti-Aliasing toggle - [Ctrl-Opt-A]
- Canvas Smoothing toggle - [Ctrl-Opt-S]
Keyboard Shortcuts For Window
- Better Performance (0.5x) - [Ctrl-Alt-1]
- Balanced (1.0x) - [Ctrl-Alt-2]
- Better Quality (1.5x) - [Ctrl-Alt-3]
- Best Quality (2.0x) - [Ctrl-Alt-4]
- Anti-Aliasing toggle - [Ctrl-Alt-A]
- Canvas Smoothing toggle - [Ctrl-Alt-S]
Was this article helpful?
That’s Great!
Thank you for your feedback
Sorry! We couldn't be helpful
Thank you for your feedback
Feedback sent
We appreciate your effort and will try to fix the article

