Share this article! Here's a short link you can use: http://im.vu/help1086
6 bones per vertex
When creating an avatar, clothing or attachment product a process called skinning is applied to the mesh geometry whereby the mesh can be deformed by a skeleton. The skeleton is a hierarchy of connected bones. Skinning assigns the bones of the skeleton to each of the vertices of the mesh.
When bones are associated with a vertex, they are given a number value between 0.0 and 1.0 of how much influence they have on the vertex. A value of 0.0 is no influence and a value 1.0 is 100% influence. This is the weight of that bone for the vertex. When many bones are assigned to a vertex, the weights must be evenly distributed between the bones and add up to a total of 1.0. This is called normalization.
| pelvisNode | lfHip | lfThigh | rtHip | rtThigh |
Vertex #1 | 0.5 | 0.2 | 0.05 | 0.2 | 0.05 |
This process of assigning bone weights to each of the vertices of a mesh is called skinning, the result being the skin weighting of the mesh.
Limiting bones per vertex
3D modeling tools such as Blender and 3ds Max allow for skinned meshes to have a large number of bones per vertex (up to 100 bones per vertex in the case of 3ds Max). Each bone adds more data that needs to be stored and processed. Having more bones per vertex comes at a cost in performance during data upload/download and engine rendering.
Historically, in game development, there has been a standard of 4 bones per vertex. Both Unity and Unreal Engine historically used 4, although now support more. The IMVU Northstar engine used by all Next platforms (Studio, Web, Desktop, iOS, and Android) supports up to 6 bones per vertex.
When a vertex is assigned more than 6 bones, only the 6 greatest weight values will be used, and the rest will be ignored.
What happens if there are more than 6 bones per vertex?
Here are a couple of examples with more than 6 bones per vertex demonstrating what happens when the number of bones gets limited and what the results would look like.
Example 1
In this example, the weight values are not all the same. The 6 greatest weight values will be used and normalized, and the rest will be ignored.
Original from 3D editor
| pelvisNode | lfHip | lfThigh | lfCalf | rtHip | rtThigh | rtCalf |
Vertex #1 | 0.4 | 0.15 | 0.1 | 0.05 | 0.15 | 0.1 | 0.05 |
Northstar engine result
| pelvisNode | lfHip | lfThigh | lfCalf | rtHip | rtThigh |
|
Vertex #1 | 0.7 | 0.1 | 0.045 | 0.01 | 0.1 | 0.045 |
|
Example 2
In this example the weight values are all the same. Only 6 weight values will be used and normalized and the rest ignored.
Original from 3D editor
| lfHip | lfThigh | lfCalf | lfFoot | rtHip | rtThigh | rtCalf | rtFoot |
Vertex #1 | 0.125 | 0.125 | 0.125 | 0.125 | 0.125 | 0.125 | 0.125 | 0.125 |
Northstar engine result
| lfHip | lfThigh | lfCalf | lfFoot | rtHip | rtThigh |
| |
Vertex #1 | 0.166 | 0.166 | 0.166 | 0.166 | 0.166 | 0.166 |
|
Workflow
Fortunately, there is a way to prevent issues right from the start in your 3D editing tool. Most 3D editors have controls for limiting the number of bones per vertex. Here are the workflows for a couple of the most popular 3D editors used by IMVU creators.
3ds Max
Set the ‘Bone Affect Limit’ to 6 in the Skin Modifier panel before you begin weighing your mesh.

3ds Max Skin Modifier panel
Blender (version 2.83)
Bone weight limits are set by running a tool. The best workflow would be to run the Limit Total tool as you work and not after you have completed all of your weighting. More information about the tool can be found here Weight Paint – Limit Total

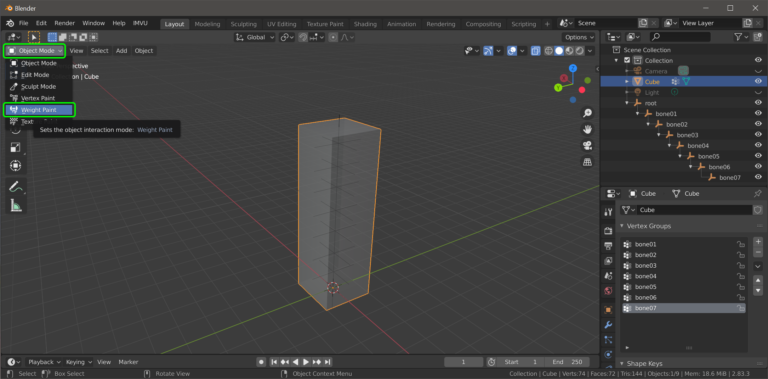
Switch to Weight Paint mode

Run the Limit Total tool

Set the Subset to ‘All Groups’ and the Limit to 6
Was this article helpful?
That’s Great!
Thank you for your feedback
Sorry! We couldn't be helpful
Thank you for your feedback
Feedback sent
We appreciate your effort and will try to fix the article