Practice to learn the basics. Take a photo of a "Ball" or Circle with a solid background, such as Black or Neon Green. Let's go Very Basic. To see the concept...Use this for your "Diffuse" or main material. I know this is very basic, bear with me for a bit... Now you need the material that does the "Cutout". It is called an "Opactiy".
Use your "Selectct Tool" to select the BackGround of your photo. The "Tool" may be called many things depending on your Graphic Editor. In GIMP, The Selection Tools has a sub-Menu. Grab the Selection Tool "By Color". Click the Background of the Circle Photo. Open this "Selection as a New Material. We will save it as the Opacity Material. When you save this, if the "Circle" part is not completely White, fill it with white.
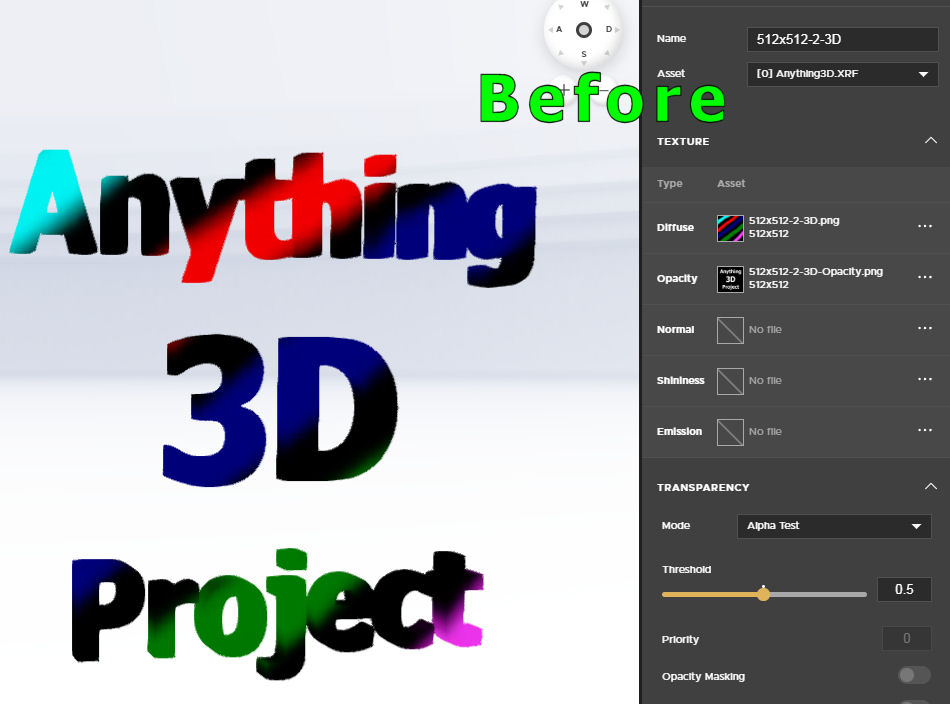
Okay, let us put both of these on the test project, PID 11429955. Below are "before-and-after" snapshots. Add your Diffuse and Opacity Materials:
Before:
After: (Press Preview in Studio)
I prefer to leave the Transparency Mode as Alpha Test for Sharp Clean Edges. Some like the Composite Blend. Most times the edges are blurred and fuzzy.
Speaking of cleaning the edges... Work with your Opacity Material to soften the edges. A simple slight Blur and or softening mayy do it for you. I will soften and then slightly darken my Opacity Material. Let's see the edge results...
i want to create my own backgrounds and cutouts but im struggling on how to make the i cant find anything on youtube nothing so please help me out:)
0 Votes
5 Comments
Bleedinqlove posted about 1 year ago
I’ve figured out how to do it but I’m struggling to make partial with words
1 Votes
LestatDeLioncourt posted about 1 year ago
Hey @Flutterisbaeee ,
1- Where are you getting stuck?
2- What graphic Editor are you using?
More information, please...
0 Votes
LestatDeLioncourt posted about 1 year ago
Maybe Staff will consider adding a simple cutout to the Creator Education Center https://create.imvu.com/
More on Opacity Maps is located Here: https://create.imvu.com/articles/studio/imvu-studio-opacity-maps/
~Enjoy Life
0 Votes
Bleedinqlove posted about 1 year ago
I’m badly struggling do u have any videos to help me I’m new to this n it’s hard for me
1 Votes
LestatDeLioncourt posted about 1 year ago
Making Cutouts is an interesting task. Once you get it, it is not hard.
 I know this is very basic, bear with me for a bit... Now you need the material that does the "Cutout". It is called an "Opactiy".

Start with something easy to do. Maybe something like This? https://www.imvu.com/shop/product.php?products_id=11429955
Practice to learn the basics. Take a photo of a "Ball" or Circle with a solid background, such as Black or Neon Green.
Let's go Very Basic. To see the concept...Use this for your "Diffuse" or main material.
Use your "Selectct Tool" to select the BackGround of your photo. The "Tool" may be called many things depending on your Graphic Editor. In GIMP, The Selection Tools has a sub-Menu. Grab the Selection Tool "By Color". Click the Background of the Circle Photo. Open this "Selection as a New Material. We will save it as the Opacity Material. When you save this, if the "Circle" part is not completely White, fill it with white.
Note: Most good graphic editors have Modifiers that allow you to "tweak" the Selection Tool so it grabs what you want. Read more for GIMP HERE: https://docs.gimp.org/en/gimp-tool-by-color-select.html
Use this for your Opacity Material:
Okay, let us put both of these on the test project, PID 11429955. Below are "before-and-after" snapshots.

Add your Diffuse and Opacity Materials:
Before:
After: (Press Preview in Studio)
I prefer to leave the Transparency Mode as Alpha Test for Sharp Clean Edges. Some like the Composite Blend. Most times the edges are blurred and fuzzy.
 Work with your Opacity Material to soften the edges. A simple slight Blur and or softening mayy do it for you.
Speaking of cleaning the edges...
I will soften and then slightly darken my Opacity Material. Let's see the edge results...
Post if you have questions... I am here :)
0 Votes
Login to post a comment